It’s the little things
We are excited that we have gotten a lot of the bigger house projects out of the way, so that we can start doing some of the smaller things that can make our lives easier. Today it was $16 ($20 with a 20% off coupon at Bed Bath & Beyond) that finally got our shoes out of a jumbled mess on our closet floor!
I even reused the box it came in to cut out supports for my tall boots. 🙂

Reclaimed wood wall art panels
Here’s my latest Pinterest-inspired project!
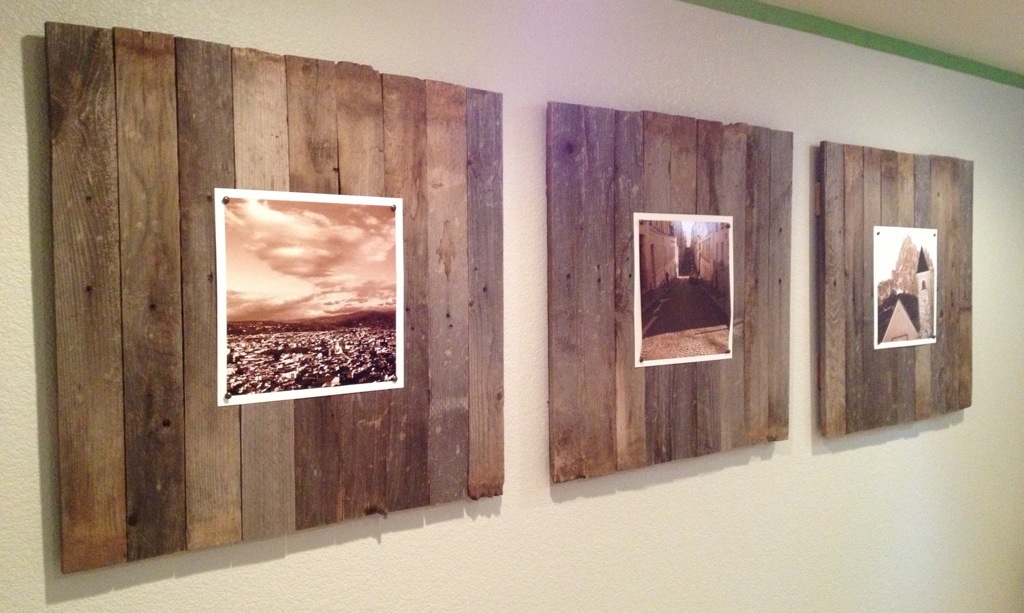
Matt had torn down (and then rebuilt) an old fence in our backyard and so we had a bunch of pickets I could use for this project. I had seen this pin on Pinterest, and thought it could be something that I could DIY. I wanted something fairly large to hang on some empty walls in our basement rec room, so I thought this would be worth a shot, and enlarged some photos from our honeymoon. It turned out to be a pretty easy project, and I did all three for less than $30 since I already had a lot of the materials on hand. Not bad, considering the original pin links to a similar item being sold for $110 each!
The pickets had already been cut to a similar length, thanks to our fence improvement project, so all I had to do was lay them out to form a square and them drill a couple pieces on the back to hold them all together. I varied the cut sides (some are at the top, and others at the bottom.


I screwed them together from the back, so you don’t see them from the front. They are around 30″ square.
Then I added hanging hardware on the back, as well as some adhesive cork (it’s drawer liner) to the bottom corners to save the wall from getting scratched and to provide a bit of grip to keep them steady and even once hung. You could easily use other types of picture/frame stabilizers- I was just using what I had around.


It was Matt’s idea to use upholstery tacks to hold the pictures in place – this way the art can be easily changed out.
I also put some poster board behind these photos to make them pop a bit more.
Here’s a budget breakdown of this project:
Wood – luckily free, we had it around
Screws – we already had these
Hanging hardware – $2
Cork for stabilizing – already had this, too
Poster board – $14! (Note to self, don’t send hubby to the craft store on an errand. He’s not a bargain hunter like me.)
Upholstery tacks – $2
Photo enlargements – $3 each at CostCo = $9
TOTAL: $27
I love the look of the weathered wood. I’m a bit surprised by this, because I typically like really modern-style home furnishings… so this look is something I haven’t done before. The art really fills up this wall, and I love that we can swap out the photos in the future, if we want. What do you think?


The best and worst of newborns
The best things of having a newborn (again):
1. When you put them down, they’re still there when you go back later. Nuff said.
2. The happy Buddha face when they’ve got a full belly.
3. You get to snuggle them as much as you want… They can’t yet squirm away (nor do they want to)!
The worst things about having a newborn (again):
1. The razor sharp fingernails. Add sore nipples and flailing baby limbs to this, and you’ve got a recipe for disaster.
2. Lets address the elephant in the room: sleep deprivation. This special part of parental torture means that you are always one small mishap away from cracking. The yogurt container that jumps out of the fridge when you open the door now becomes an expletive-laced sob-inducing event, as opposed to just, “oops!” I guess it’s “irritability” on steroids.
3. Nursing loneliness. You spend several hours a day, sitting, alone with your newborn, feeding them. Depending on the day, or the hour, this item could also be on the “best” list. Sometimes you feel like you’re a spectator in life, because everyone else gets to carry on, doing things.

More floating shelves!
I think we are a bit obsessed with floating shelves. We used them a lot in our previous (teeny) home for obvious reasons (space, or lack thereof!)… but now we just really love them. I think we have them installed in every room of the main floor of our house.
I had been wanting to build this magnificent and modern/industrial shelving unit for our living room to put our TV on. I was inspired by this. I had priced it all out, drawn sketches, taken measurements, etc. But the $350-ish price tag for materials and the amount of work it was going to take to assemble it… well, life seemed to get in the way of that actually happening. So I found new inspiration that seemed a lot easier and cheaper – this pin on Pinterest.
So three $20 shelves from IKEA and less than an hour of labor transformed our living room and now we have this:

It saved us from having to buy an expensive TV wall mount, and it provides much-needed shelf space for some decorative items and plants. And my husband did such an amazing job hiding all the cords, don’t you think? He found these gems (in white) at the hardware store, it allowed us to hide most of the cords for the TV, XBox, and stereo. They just drop through behind the drywall. That middle basket on the floor is actually hiding all the cords, outlet, and a subwoofer.
Even though there will always be a small part of me lusting after pipe shelving, we should have done this ages ago!
Hope’s birth
Today my daughter, Hope, is a month old. Yet her due date was just four days ago. I want to write down her birth story before it gets lost in the blur. Having a newborn, I am fully in the blur right now.
Due to the bleeding episodes that I had due to a low-lying placenta during my pregnancy, I was hospitalized once at 26 weeks (for four days) and then again at 32 weeks (for four weeks). The plan during my 2nd hospitalization was to stay put in the hospital until delivery. I actually wrote a blog post about hospital bed rest, but it was such a pity party that I did not publish it on here. Maybe I will someday.
The fact that I continued to have bleeding episodes throughout the end of the pregnancy indicated a danger of a major hemorrhage (also known as a placental abruption) that would have put my life and baby’s life in danger. The perinatologists (high-risk OB’s) suggested that we deliver the baby at 37 weeks gestation. I had been given steroids for the baby’s development, and overall, the outlook for a 37-gestation little girl was not risky…
However, during the 35th week, I had two more bleeding episodes, so the doctors recommended that we deliver at 36 weeks. So, on July 17th, the doctors scheduled me for a cesarean for Friday, July 19th. I asked for one more ultrasound to determine the location of the placenta; and after all this time of barely budging, the placenta was finally over 2 centimeters from the cervix, which was the minimum “required” by the doctors to try for a vaginal birth for a low placenta. So just a couple hours before my scheduled cesarean, the plan changed and I opted for an induction instead.
While in some respects, this was a scarier option (risk of hemorrhaging and an emergency c-section), I still wanted to try. I wanted to be spared the surgery and recovery, if possible.
The induction started around 1pm on July 19th. I opted to have an epidural pretty early in the process, because I wanted to be awake if I needed an emergency c-section. This meant I was stuck, horizontal, in bed through all of it. I also was apparently pretty sensitive to the epidural, and it caused my normally low blood pressure to drop even further. So I was woozy and weak off and on. It felt awful.
Quite a difference from the unmedicated birth I had with Norah! I had regular contractions through all of it, but was not dilating much. By 7am the following morning I was still only 2cm dilated. They broke my bag of waters shortly thereafter, and I finally managed to doze for a couple of hours after that. This is when my paranoia was hard to manage, because having amniotic fluid leak out of you feels exactly like the scary bleeds I had been having for weeks. I kept needing to be reassured that it was amniotic fluid, and not blood (since I couldn’t see over my belly!).
Sometime before 11am, they checked my progress, and I was fully dialated! They immediately started to get the room prepped, and I continued to be a basket case about bleeding. They kept reassuring me that it was a normal amount of blood for a birth. I pushed for maybe 10 minutes, and Hope was born. She, like her older sister, had the umbilical cord around her neck twice… but once again, the docs simply unwound it, and she was fine. In fact, she screamed and recovered from birth much quicker and better than Norah did. Her first Apgar score was 8, amazingly. She was so teeny tiny, but so strong. She weighed 5 pounds 8 ounces and was 18 3/4 inches long. She nursed within minutes of being born.
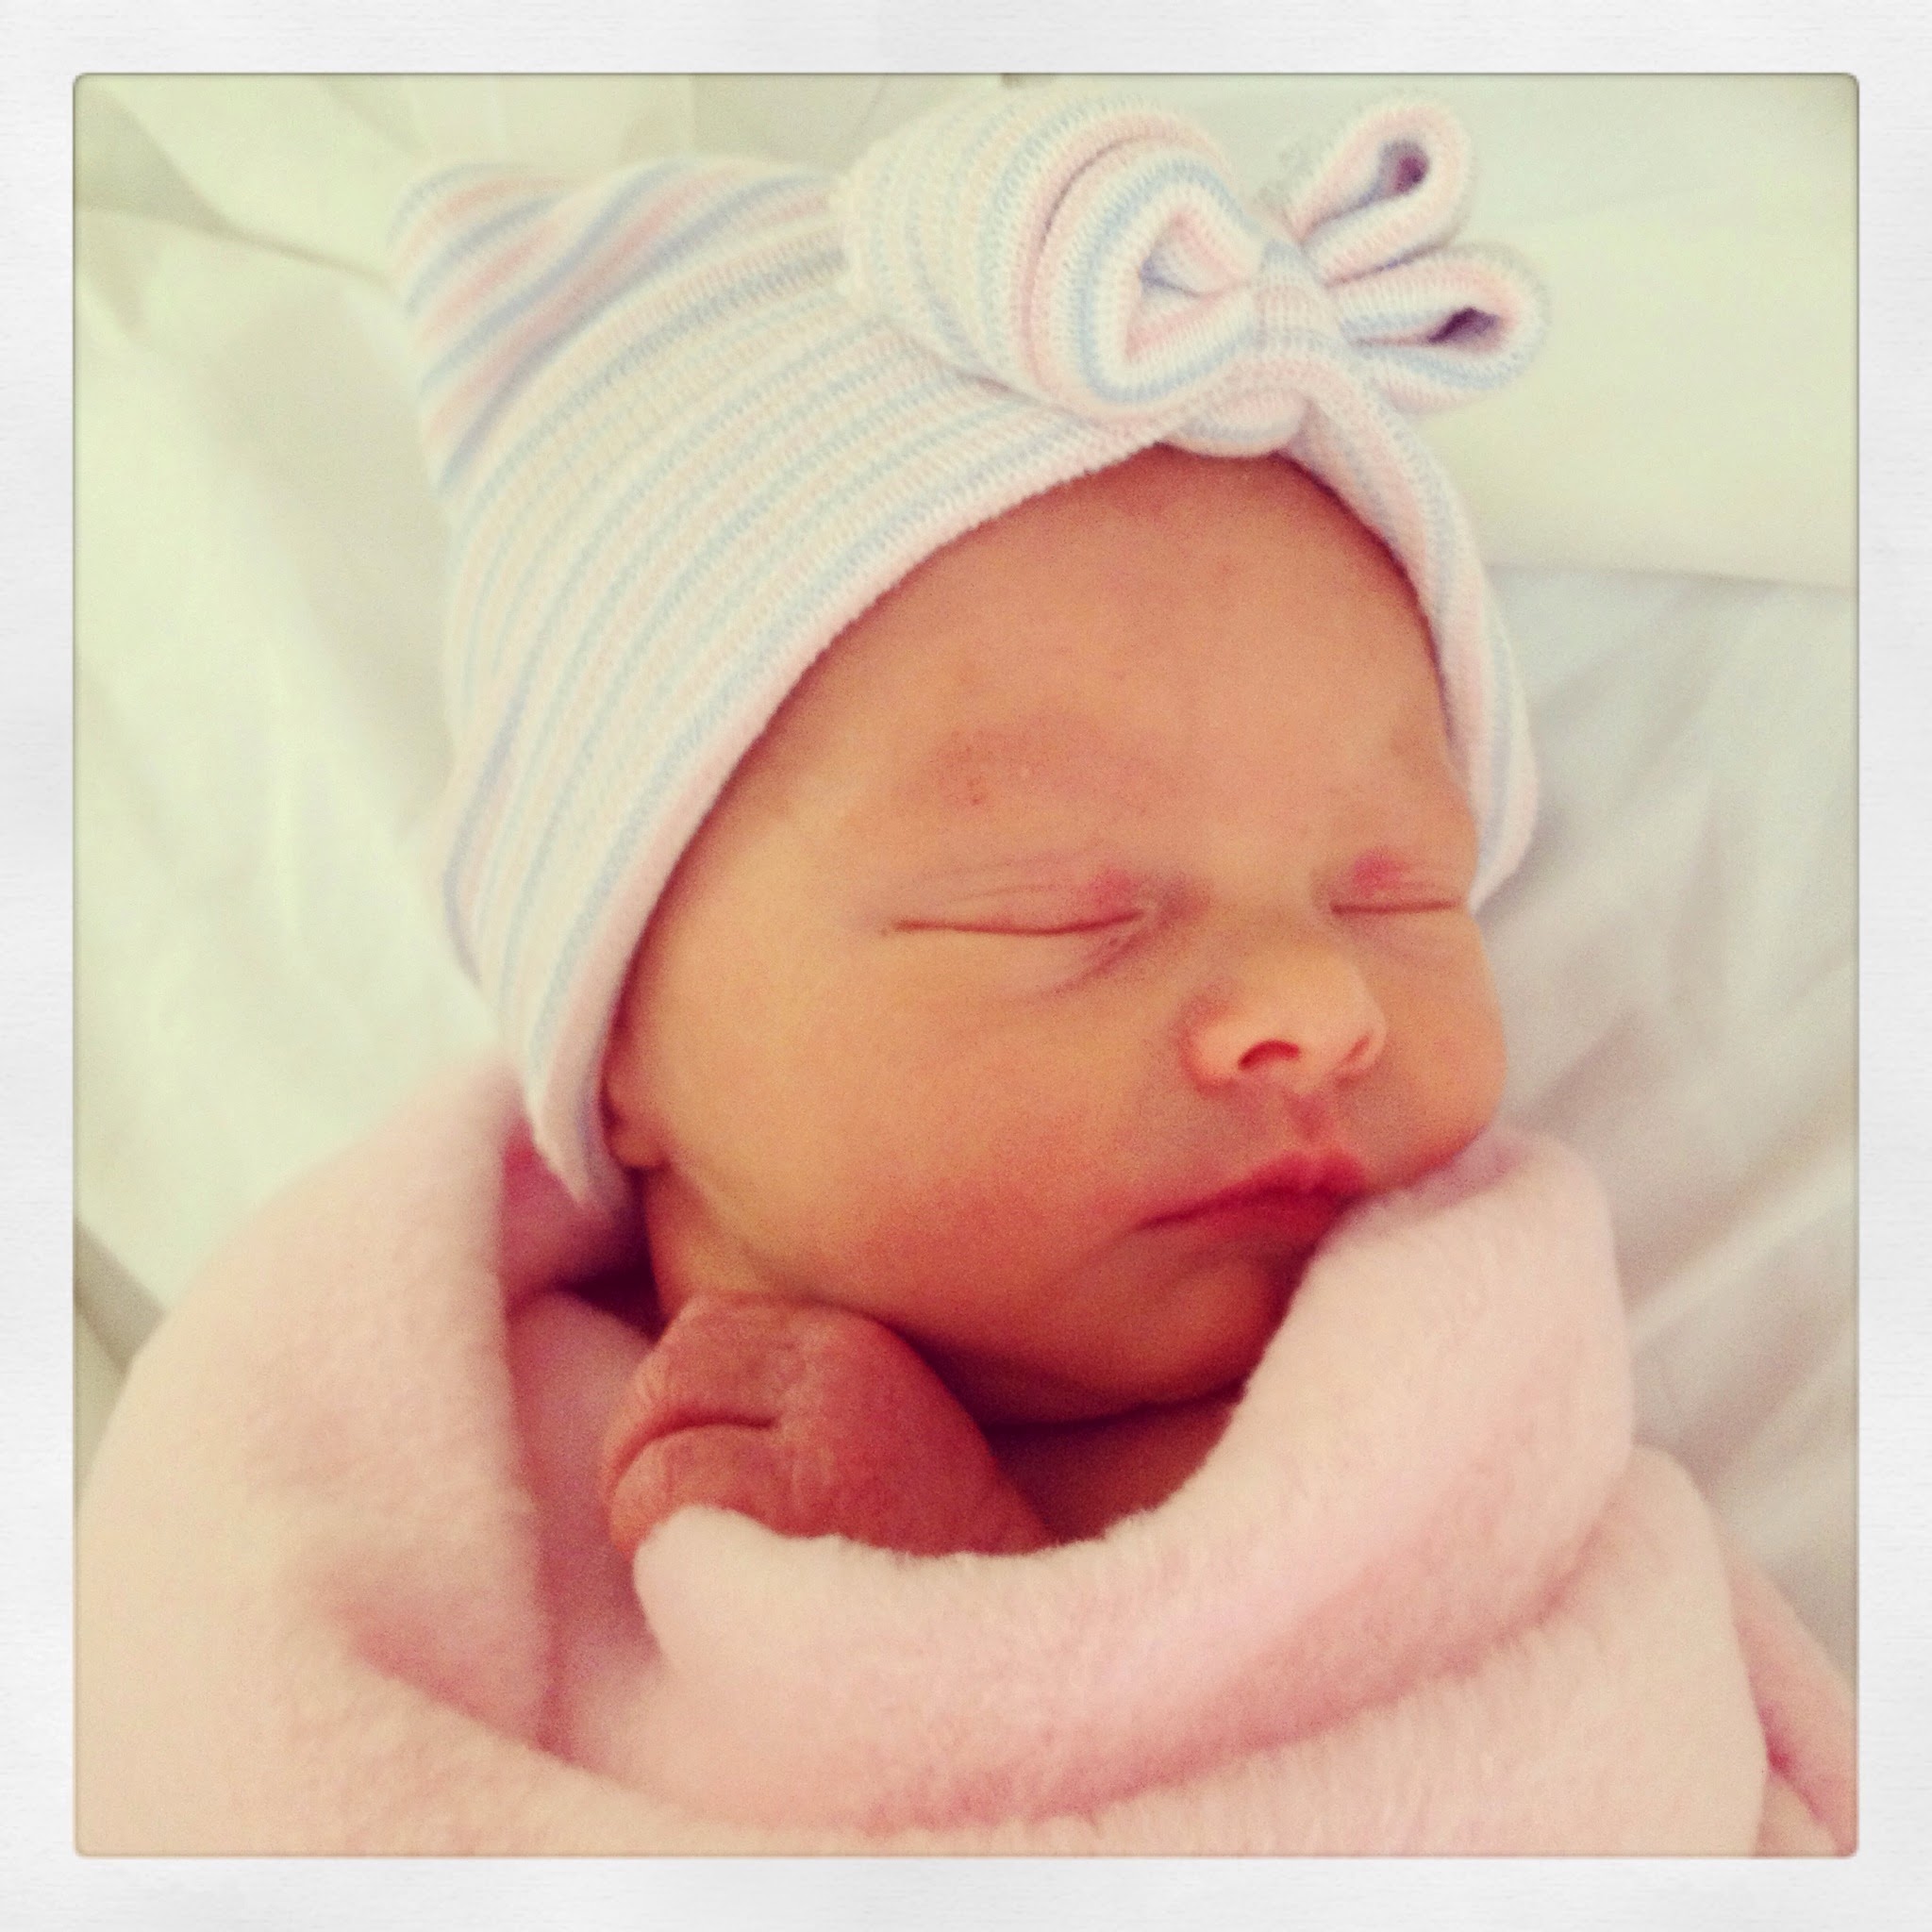
She is named after her great-great-grandmother. And her middle name, Victoria, is after her grandfather, Victor.
I am so grateful that everything turned out so perfectly, especially after such a scary pregnancy. And strangely, I am actually really glad that I got to experience both an unmedicated birth, and a full-on medicated birth. They were such incredibly different experiences! While I hated the feeling of the epidural (both the numb legs and the low blood pressure wooziness), being stuck in bed with so many tubes going in and out of me, and just overall the medical nature of it… the positives were that I would say that overall I experienced discomfort, not pain — and because of that, I felt so much more present for this birth. Because I was not lost in the pain, I have a clearer memory of Hope’s arrival and I got to experience the emotions of giving birth. I cried tears of joy when I got to hold her for the first time. With Norah’s birth, I was still in incredible pain and just in shock, I think, when she was born.
Because Hope was so strong, and I think they took pity on me having been in the hospital for four weeks; we were released to go home the next day. Luckily my insurance provides for an in-home visit from the nurse, so that we could go home, but still have Hope checked 48 hours after birth.
Hope received donor breast milk for the first few days of life, until my own milk came in. The reason for this is that they don’t want such small babies to lose too much of their birth weight. She has proven to be a great eater and is growing very well so far.
I am so happy that I have two healthy little girls. And I am ecstatic that I never plan to be pregnant again! =)

About

Hi, I am a 30-something working mom in Colorado. We are into green living, the outdoors, travel, adventures in parenting, and DIY home improvements.
I started this blog when we lived in a 733-square-foot home, hence the name. Since then, we have moved to a 1950s fixer-upper ranch that is around 2,000 square feet.
-
Archives
- August 2014 (1)
- December 2013 (1)
- October 2013 (2)
- September 2013 (2)
- August 2013 (5)
- May 2013 (2)
- April 2013 (2)
- March 2013 (3)
- February 2013 (1)
- October 2012 (1)
- September 2012 (1)
- July 2012 (2)
-
Categories
-
RSS
Entries RSS
Comments RSS
